How to Install Shipping Container Shelves
Post updated on January 11, 2024
Adding shelves to your shipping container is a great way to maximize your storage space and keep it organized.
All our new BigSteelBoxes are equipped with D-rings every 4-feet, making the addition of shelving to your shipping container quick and easy. We rent shelf brackets for $5 each per month, or you can buy them for $80 per bracket. We’ll even deliver them with your BigSteelBox! Check out the video to see how it works:
How many shelves can I add to my shipping container?

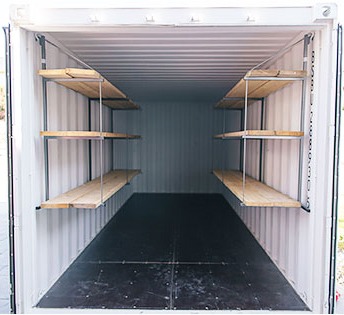
Our shelving brackets are designed to create 3 shelves. This allows you to add up to three levels of shelving to each side of a BigSteelBox in a variety of lengths depending on the size of the shipping container.
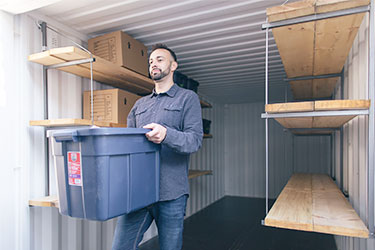
Shelving is a handy add-on to a BigSteelBox rental container because it allows you to stack items in sections and gives you a walkway down the middle.
How much weight can a shipping container bracket hold?
Each shipping container shelf bracket can hold up to 1,000 lbs. Using four brackets along one side of the BigSteelBox will hold up to 4,000 lbs., so storing heavy tools or equipment is not a problem.
Shelf brackets can be installed in minutes and once they are in place, use two 2’X10′ pieces of construction grade wood per shelf to create a 19″ deep shelf. (Note: lumber is not included in the rental or sale of the shelving brackets).
How to Install Shipping Container Shelves: Installation Process
Follow these simple steps to install shelving in your BigSteelBox shipping container:
Step 1: Using the D-rings located every 4-feet along the top of your shipping container, hook the curved end of the shelf bracket into the D-ring. The lower “T-shaped” portion of the shelf bracket will rest against the interior wall and hold it securely in place.
Step 2: One and a time, slide two 2’X10’ pieces of construction wood grade planks through the bracket openings.
Step 3: Once you have both wooden planks through all the shelf brackets, lean them against one another to make a peaked, triangle shape in the centre, and then firmly press down to snap them into place. This should leave no space gaps between the planks or the planks and the shipping container wall.
Step 4: Repeat steps 2-3 for the remaining 2 levels.
Why install shelving in a shipping container?

Many types of customers benefit from having shelves in their portable storage container. Sea can shelving saves our customers time and money by keeping their items safe and organized, plus they promote safety by keeping the walk space clear of hazards and minimizing the need to bend and lift items off the floor.
Here are just a few industries and types of organizations that find shipping container shelves very helpful:
And, of course, homeowners also find shelving is very useful to have in their storage containers, especially if they’re using it during a home renovation or as a storage shed in their yard.
Contact us at 1-800-373-1187 to speak with a BigSteelBox Storage Consultant and order your BigSteelBox with shelving brackets today.


